Accounts Receivable
Entering Cash in Accounts Receivable
Option A - Enter Cash on the Ledger Screen
Option B - Enter Cash via Data File Utility Screen
Option W - Work With Accounts In Use
Also known as Cash Application, this program lets you apply cash received by viewing an account's open accounts receivable (A/R) ledger on a screen and entering cash transactions beside the ledger listing. Several methods are available for applying cash, so you should choose the method that best suits your company. The most commonly used Cash Application screen shows six open lines at a time and lets you view the entire A/R status of an account while applying cash.
This is a check control system with optional batch control.
- We recommend that you use the batch control option, so the system can inform you of the running batch accumulation as well as check accumulation. However, you can omit batch numbers and batch totals.
- If the cash applied per check does not equal the check amount entered on screen 1 for every check, the batch is considered out of balance and unacceptable for posting. For best control, each batch should represent a deposit slip. For example, if you enter $18.00 in the Check Amount field on screen 1, and then apply $20.00 on screen 2, the check control is deemed out of balance, and the entire batch is unacceptable for posting. You must apply on screen 2 the exact amount you enter into the Check Amount field on screen 1.
- An edit of cash is required before posting each application.
Option A - Enter Cash on the Ledger Screen
This is the primary method for entering cash and other receivables.
One Check Paying Multiple Accounts
Writing off Invoices to GL Account
Credits Due to Reduction of Payables
Auto Post Small Differences for Cash Application
Making Corrections on the AR Ledger Screen
Two screens are available for this program:
- Screen 1 is the Parameter Screen, which prompts you for batch and check control figures.
- Screen 2 is the Ledger Screen, where the cash is applied to open invoices or credits.
Parameter Screen
The parameter screen prompts you for batch and check control figures.
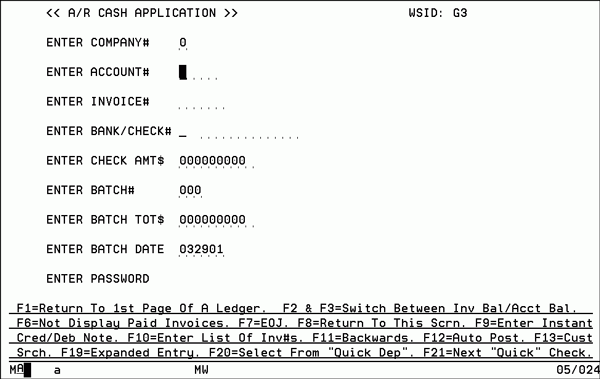
| Field Name | Action |
| Enter Company# | Enter the one-digit number of the company the account is assigned to. |
| Enter Account# | Enter the five-digit account number the cash is applied to. |
| Enter Invoice# | Leave blank if you want to see all open items for this account. Enter an invoice number if you want the ledger screen to only show items having invoice numbers greater or equal to what is entered here. This is not the invoice number you apply cash to. It is the only point where you want the account's ledger to begin. |
| Enter Check# | Enter the check number as it appears on the check from the customer. There are 14 alphanumeric positions provided. The first character is shown separately and should include a one-character code representing the bank the check is deposited in. If you only use one bank, always enter A in this field, otherwise assign a letter to represent each bank you use. Enter the client's check number in the remaining 13 positions. You can also enter relevant reference information here. For example, A W/O 17853- for deposit in Bank A; write-off of invoice #17853. |
| Enter Check Amount $ | Enter the dollar value of the check from the customer. Assume two decimal places. If a check is paying more than one account, enter the full amount of the check here and pay the individual accordingly. |
| Enter Batch# | Enter the unique number you assigned to this batch of checks to be posted. This number should refer to a bank deposit or other accounting record. After a batch has been edited and posted, reuse the batch number. If you have a single batch of cash each day, use the day of the month as the batch number. For example, if it is the 17th of the month, use batch# 17. |
| Enter Batch Total $ | Enter the total amount of all checks to be included in this batch. This should equal a bank deposit or accounting record. |
| Enter Batch Date | The default is today's date. You can override it if the date of the cash receipt is not today's date. |
| Enter Password | Enter the required password. |
Function Key
| Function Key | Action |
| F1 | Pressing F1 returns you to the first page of the ledger. |
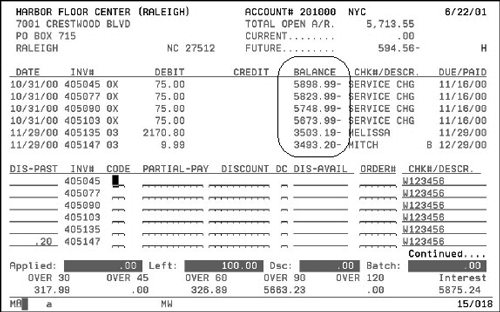
| F2 | If you want the A/R Ledger to show invoice balance, press F2 instead of Enter. Normally, the ledger shows the running balance. |
| F3 | If you want to revert back to a running balance, press F3 instead of Enter. |
| F6 |
When you press F6 instead of Enter, the program does not display invoices already paid. Normally, invoices paid drop the ledger at the end of each month. This command is useful only for accounts having large numbers of invoices paid each month. It displays invoices still open. You can only use this function if your system default is set to allow you to see paid invoices. |
| F7 | End of job |
| F8 | Return to ledger Screen 1 - parameter screen |
| F9 |
Pressing F9 allows you to automatically enter an instant debit or credit note on a customer's account. A report back-up is automatically generated when this option is used. You should keep this report for future reference. |
| F10 | Pressing F10 allows cash application by a list of invoice numbers from a customer's remittance. |
| F11 | Takes you back to the previous ledger page. |
| F12 | If you want the computer to automatically apply the amount received to the oldest open receivables. |
| F13 | If you do not know the customer's account, press F13 to display a customer search. |
| F19 | Pressing F19 allows cash application using an expanded ledger screen where you can view 32 invoices at a time. |
| F20 | If using Quick Deposits, you can retrieve the batch to apply cash against invoices already entered. |
| F21 | Brings up the next available check within the Quick Deposit batch. |
Enter the necessary information and press Enter to access the Ledger Screen.
Ledger Screen
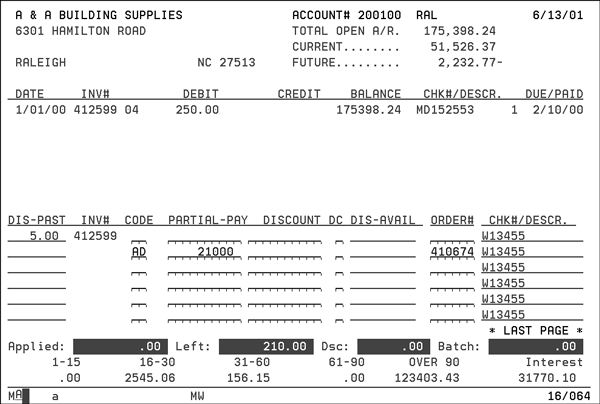
This is the second screen in the AR enter cash process. On the ledger screen, you can enter transactions against six open items at one time. You can make entries against any, all, or none of the items shown. When you press Enter, all of your entries on the screen are recorded.
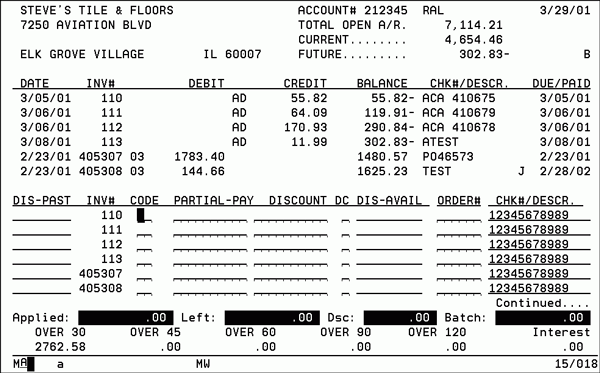
The Ledger Screen displays the following information:
- BillTo file name and address in the top left corner
- The Total Open A/R, Current, and Future in the top right corner and the aging on the bottom of screen.
- The future amount is the total of all open items with invoice dates later than today's date.
- The current amount is the total of all open items dated less than 16 days ago, but not the future date.
- Inquiry area (top half) displays the following:
- up to six open items in invoice number order.
- invoice date
- invoice number
- transaction codes
- debit amount
- credit amount
- open balance
- customer's PO number or check
- dispute code (if any)
- the due or pay date
- Input area (bottom half)
- Lists the same six invoice numbers that appear in the upper half. This time the invoice numbers are followed by four input fields used for applying cash.
- By entering into the fields next to an invoice number, you can apply cash and cash discounts against that invoice or item.
- The interest, shown in the lower right of screen, is a result of the automatic interest assessment feature. The screen is split into two portions:
If Continued appears in the lower right corner, there are more open items on this account's ledger. Press Enter to display the next six items. If Last Page appears in the lower right corner, there are more no open items on this account's ledger. Pressing Enter on Screen 2 will display the next six items. If you are on the second page of a ledger or higher, press F1 to redisplay the ledger from the first page.
The following table describes the fields on the Ledger Screen, and different ways of applying cash and cash discounts.
|
Field Name |
Action |
|
Dis-Past |
This field is for display only. You cannot enter data into it. It displays the discount past. Discount past is the discount that was available the terms due date passed. In cases of multiple discounts; 5% 15, 3% 45; this would display the most recent past discount. For example, if the invoice was dated 01/01/99 and terms were 5% 15, 3% 45, Net 46, on 01/02/99, the Dis-Pastfield is blank and the Dis-Availfield displays the 3% amount. After 02/06/99, the Dis-Past field displays the 3% discount amount and theDis-Availfield is blank. |
|
Inv# |
This column redisplays the invoice numbers listed in the top half of the screen. The fields to the right of each invoice number are for applying cash and discounts against each invoice. |
|
AR Transaction Codes |
Enter the two-character cash transaction code that best suits the transaction. Transactions cannot be entered without a valid code. To search all the codes enter a ? in the field. The codes are as follows:
Note: For more information refer to, Advance Deposits.
The OA, AD and DM codes are different from other codes, because they do not apply to a single invoice and sometimes do not apply to an existing invoice. When entering these codes, type OA, AD, or DM in the Code field for any of the displayed invoice numbers, and the amount of payment in the Partial Pay field. Unlike all other codes, these do not attach and apply themselves to the invoice numbers beside which they are entered. They create their own invoice numbers using an unlimited number span for each account. You enter these codes beside any invoice number on the display screen without applying any credit to that invoice number. When edited and posted, these on-account, advance deposit, and debit memos will show at the top of the accounts ledger with the invoice numbers starting at 101. When using these codes, extra pages appear when the last page of an account ledger screen has no more open lines for entries and the check is not reconciled. This can be important when an account has very few open lines on the ledger, but your payment requires the entry of debit memos or other entries. Using on-account payments causes open transactions to accumulate on an account's ledger. This makes the ledger difficult to read and assess as to what invoices are truly open.
Note: Refer to Credits Due to Reduction of Payables for more information.
The codes PF, QF, and CF are the only three codes requiring no entry in the Partial Pay field: PF for payment in full; CF for full use of credit; QF for payment in full of commission invoice. When you use these codes, the system inserts the open balance for the item into the Partial Pay field logistically. The Discount field is used in conjunction with these codes. Use CF to key off a credit balance. A PF entry against a $10.00 debit applies a $10.00 credit to the item regardless of the Discount field entry. If you entered $1.00 in the Discount field, it means the cash received was $9.00. You can enter X for PF and CF entries. The system will enter the correct codes for the invoices depending on its debit or credit entry.
Note: For more information, refer to Entering WC for Bounced Checks.
|
|
Partial Pay |
Enter the dollar amount you want credited against this item. Note, the amount credited is equal to the cash being paid plus any discount being allowed. When using Pay In Full (PF) or Credit Used system automatically applies the entire open balance of the item. |
|
Discount |
Enter the dollar amount of discount you are applying to this item. For example, if you enter $10.00 in the Partial Pay field and $2.00 in the Discount field, the computer applies $10.00 credit towards this item and assumes the check from the customer covered $8.00 of the $10.00. The computer adds $8.00 to its check control total which would be compared to the total that you entered in the Check Amount field on Screen 1. Partial Pay field represents the credit against A/R. Make note of the following formula: A/R Credit (Partial Pay) - Discount = Cash Received The most common discount situation is a payment in full with a discount taken. You enter PF in the Code field, leave the Partial Pay field blank. The system automatically assumes the full open amount of the invoice, and enters the discount taken in the Discount field. The Cash Received would be the open invoice amount less the discount. |
|
DC (Dispute Code) |
DC stands for dispute code. This is a one-character user-defined code. These codes are created in the File Maintenance portion of the Accounting Menu. It identifies transactions either the customer or accounts receivable personnel are disputing. Example codes are:
To search all the codes enter a ? in the field. You
can create codes to fit your business practices. This is done
via option AR Dispute
Code File - ACT 104 on the Accounting File Maintenance
menu.
|
|
Dis Avail |
You cannot edit this field. It shows the discount currently available for each open item. It simply multiplies the amount open by the terms discount percent allowed on the invoice. If the discount available is past the due date, no amount appears in this field. The discount past is displayed in the Dis-Past field. Use this field to compare to actual discounts being taken by customers. For companies who use multiple term discounts, for example 5% 15, 2% 45, Net 46, the current available discount is displayed in the Dis-Avail field, and the most recently lost discount appears in the Dis-Past field. |
|
Order# |
This input field is only applicable when entering advance deposits or a debit memo. When entering an advance deposit, you enter the order number here. If you are using the Invoicing system, then subsequent invoices are matched by order number and automatically applied to the advance deposit. This order number must be the one appearing on your pick list or order acknowledgement. Do not use a customer PO number. When entering debit memos, we suggest you enter the related invoice number or check number in this field. |
|
Chk#/Desc |
You cannot edit this field It displays the Check# field from Screen 1. You do not need to reenter the information. |
|
Batch and Control Totals |
Above the aging figures on the bottom of the screen are the check accumulations and running batchcontrol totals. These fields also display on Screen 1 after you start entering data. When a Batch Control total or Check Control total goes over the total entered on Screen 1, the screen blinks brightly, if you are on a terminal (PCs do not blink). For example, you are applying a $40.00 check against four $10.00 invoices on an account. You would enter $40.00 in the Check Amount field on Screen 1. You would post $10.00 against each of the four invoices on Screen 2. If you accidentally posted $11.00 against the last invoice, the Check Control total would be $41.00 and blink brightly. You can adjust your entries and the Check Control total is readjusted automatically. |
Function Keys
|
Function Key |
Action |
|
F1 |
To go back to the first page of the ledger for the account. |
|
F2 & F3 |
Switch Between Inv Bal/Acct Bal. Invoice Balance (F2)
A/R Ledger running balance screen (F3).
|
|
F6 |
Do not display paid invoices. |
|
F7 |
Ends the job and returns to the previous screen. |
|
F8 |
Returns to the Ledger Parameter screen |
|
F9 |
Enter Instant Cred/Deb Note. The Instant Credit/Debit Notes screen is used to create instant debit or credit notes to apply against a check. An example of this feature is when a customer takes a credit that is not on the account. This is considered a manual sale and a report is created only for future reference. You cannot view this invoice number through the normal computer generated invoice program. Accounting should give you the transaction codes to enter when using this feature. |
|
F10 |
Enter List of Inv#s. This method is a quick way of entering cash receipts by invoice number, if you have customers with large accounts who pay by invoice number. After you enter the invoices and press Enter, the system calculates totals. The Discount Use Code at the top of the screen can be set to:
The system assumes payments are in full and available discounts are taken. To correct any discounts or amounts, press F9 to return to the Ledger screen, and make any necessary corrections. To avoid errors, the Apply Diff? field at the bottom of the Cash Application screen will not accept numbers. If a numeric character is entered into this field, an error message appears. This will stop any overlaying of invoice information on the top portion of the screen from blind keying of invoices. |
|
F11 |
Backwards |
|
F12 |
If you pressed F12 from the first screen, the system automatically applied the cash received to open receivables. The Code and Partial Pay fields are filled in accordingly. The Auto Post function F12 applies cash to the first open item it finds and continues until the entire amount of the check has been applied. It uses the PF code to clear open debits, the CF code to clear open credits, and the partial pay code PP when it comes to an item and it does not have a sufficient amount left for full payment. You can experiment with F12 to see how it would apply a check. You can remove or change any entry F12 creates. |
|
F13 |
Customer Search |
|
F19 |
Expanded Entry You can use the Expanded Ledger method to select from paid invoices and credits using the X code. It displays 42 records on a page. The program clears the selected items including applicable discounts. This screen also provides for quick selection of multiple invoices, particularly applicable for large accounts. The system assumes payments are in full and available discounts are taken. To correct any discounts or amounts, press F9 to return to the ledger screen to do your corrections. |
|
F20 |
Select From Quick Dep You can use the Quick Deposits method to select from the Quick Deposit file that was previously entered. For detailed information refer to Option Q - Quick Deposits. |
|
F21 |
Next Quick Check |
Entering Miscellaneous Cash
You can enter non-AR miscellaneous transactions through cash application using Account #99999 for any company. This account can also be used to write-off invoices to general ledger accounts.
Branch and cost centers can be assigned when miscellaneous cash is applied.
The following figure shows a Cash Application screen with 99999 in the Enter Account# field.
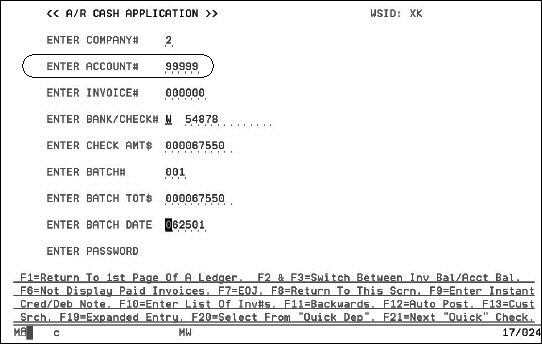
Press Enter to access the Miscellaneous Cash screen.
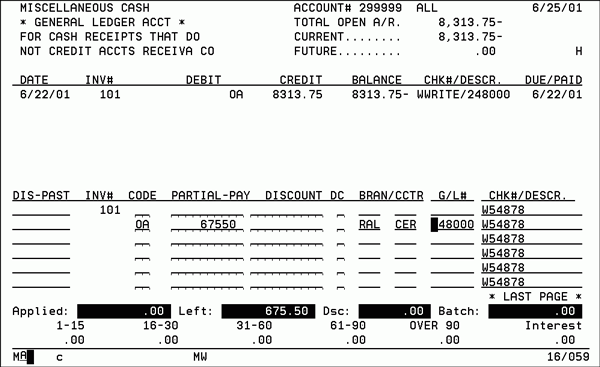
- Entries in account #99999 appear on your cash edit.
- On the end-of-month report these entries are sorted by G/L account number, branch, and cost center.
- At the end of the month, as part of option 4 on the EOM Close menu, two versions of this report print:
- The first shows suggested G/L journal entries.
- The second lists all details.
- You can also run this report during the month using the option on page two of the AR Reports menu entitled AR Miscellaneous Cash Analysis. The report has a detail version, a GL journal edit version, and a summary version. The report shows the entries needed for posting to the general ledger.
One Check Paying Multiple Accounts
If you have more than one check paying multiple account numbers, you do not have to separate the check number and amount by accounts. Enter the full check amount and apply invoices to all of the accounts without changing check number or amount.
The following shows the first cash application screen with one check (W7878) being applied against account number 01000.
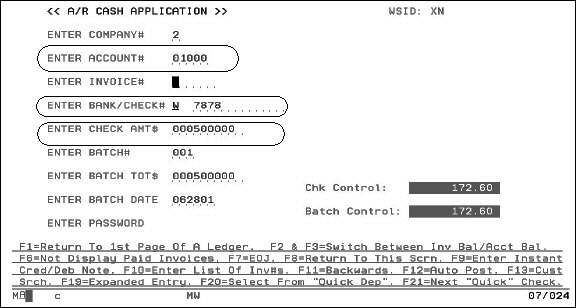
Press Enter to advance to the second cash application screen.
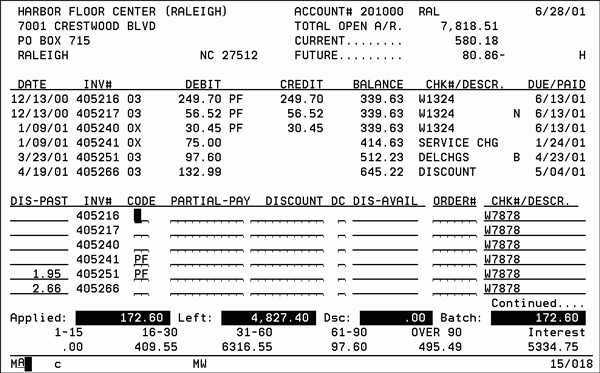
Enter a cash application code against the appropriate invoice (In the screen above PF, Paid in Full, was entered).
Press Enter, and then F8 to return to the first Cash Application screen.
Enter a new account number to issue a payment from the same check. This example shows the account number is changed to 00100.
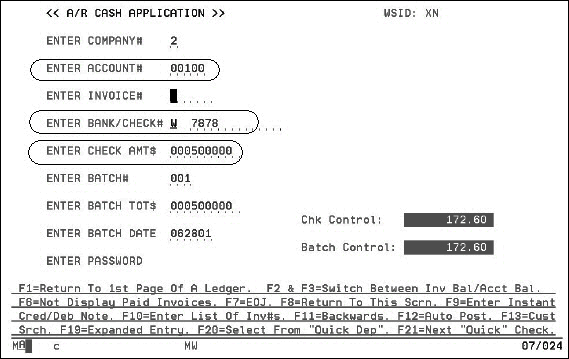
Press Enter. The second Cash Application Screen appears.
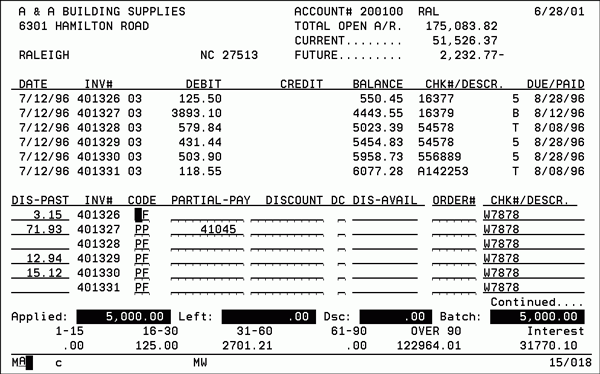
Notice how the same check number is applied against several invoices.
Writing off Invoices to GL Account
To write off invoices to a G/L account number, for example bad debts, you will need the G/L number to post to.
- On the first cash entry screen, enter the account number of the invoices that you are writing off the G/L.
- Enter the check number as W/OFF(INV#). Leave the check amount blank, since you do not want to affect cash, and press Enter.
- Enter the codes as if you are paying the invoice, for example PF, and press Enter.
- Press F8.
- Change the account number to 99999 (G/L account number posting).
- Enter code OA, the amount, as a negative number, and G/L number, and press Enter.
- Run the edit report.
Credits Due to Reduction of Payables
When suppliers issue you a credit in AP for invoices billed to them, removing these from AR requires code NC or ND and a general ledger account number. The GL account number is the same account used for the off-setting entry.
The entries made are as follows.
Entries From AR
- DR - Refunds
- CR - AR
To remove invoices from AR due to reduction of AP.
Entries From AP
- DR - AP
- CR - Sales
Credit is issued by supplier in AP.
The following screens show examples of entering codes NC or ND in AR.
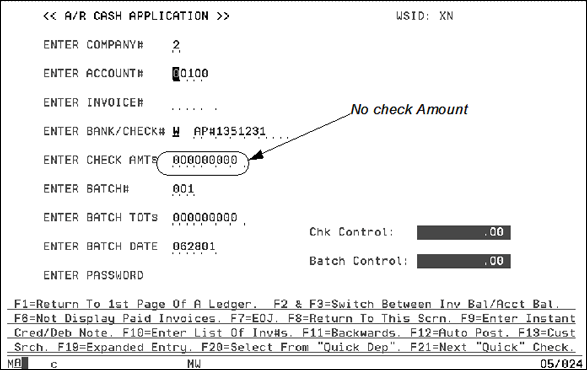
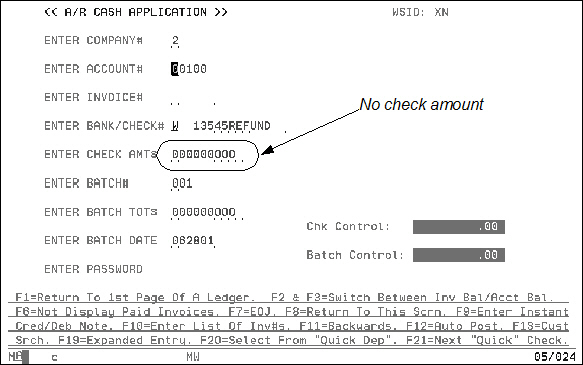
You don't enter the check amount, because you don't want to effect the cash in A/R. Entering an amount here affects your total cash received for the month.
Enter the invoice number of the credit from AP as your check number for easier auditing.
Press Enter. The Account Information Screen shows the NC Code.
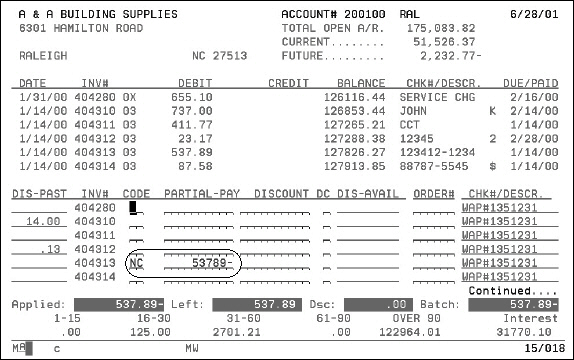
Enter code NC and the amount as a negative number on the line item with an off-setting AP credit invoice.
Press Enter to accept the entry.
Press F8 to access the Initial Cash Application Screen screen.
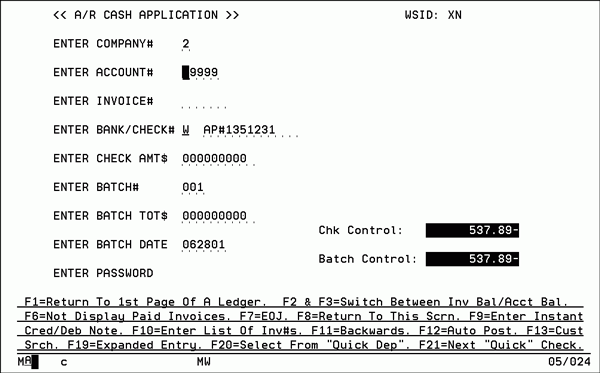
Change the account number to 99999 and press Enter. This off-sets the invoice towards the G/L account number.
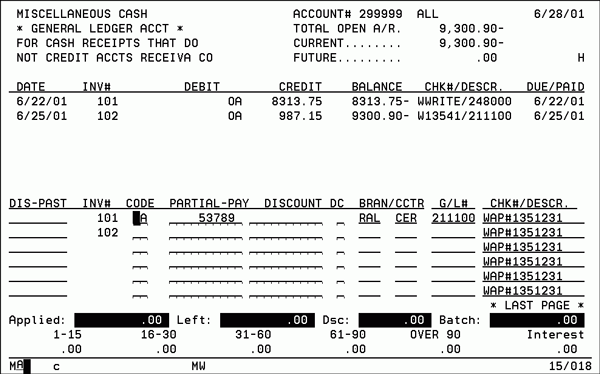
Enter code OA and the amount as a positive number as well as the corresponding branch, cost center, and General Ledger number.
Run the AR edit and post.
Refunds
To issue a refund on a credit balance in a customer's AR account, you enter a code of RF and a GL account number. The GL account number is the account used for the off-setting entry. For example, if you want to write a refund check to the customer through AR and remove the credit from the customer's account make the following entries
Entries from AR
- DR - AR
- CR - Refunds
When removing the credit from AR
AR is debited because credits reduce AR balance. Removing it from AR would increase the balance.
Entries From AP
- DR - Refunds
- CR - AP
Entries for recording refund amount
- DR - AP
- CR - Cash
The following screens are examples of screens used for entering a refund in AR.
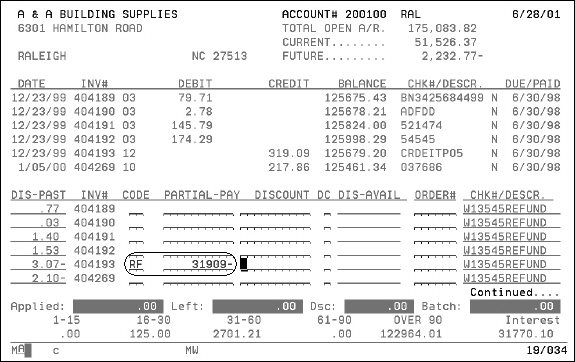
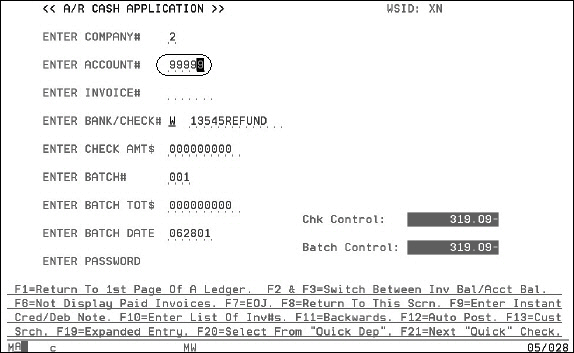
- On the A/R Cash Application screen, enter the check number of the refund check. Use the check number from AP for easier auditing.
- Press Enter. The Account Detail Information screen appears.
- Enter code RF and the refund amount as a negative for the line item being refunded.
- Press Enter to accept the entry.
- Press F8. The Cash Application Screen appears.
- Change the account number to 99999, and press Enter.
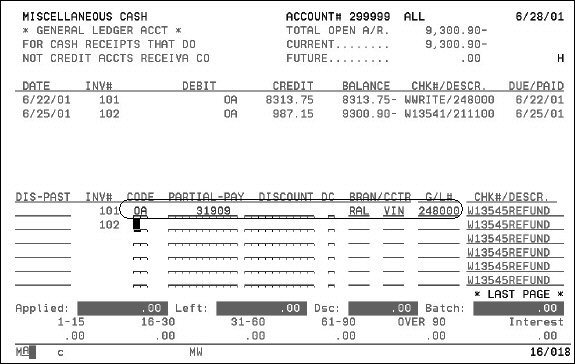
- Enter the amount as a positive amount, as well as the corresponding branch, cost center, and general ledger number.
- Run the A/R edit and post.
You don't enter the check amount, because you don't want to affect the cash in AR. Entering an amount here affects your total cash received for the month.
Reversing a Deposit
- Go into menu option AR 1.
- Select option A to Enter Cash on the Ledger screen.
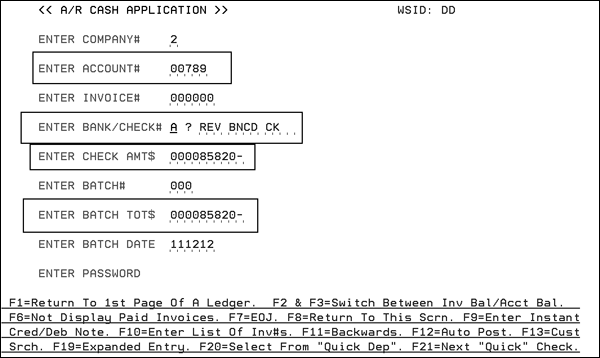
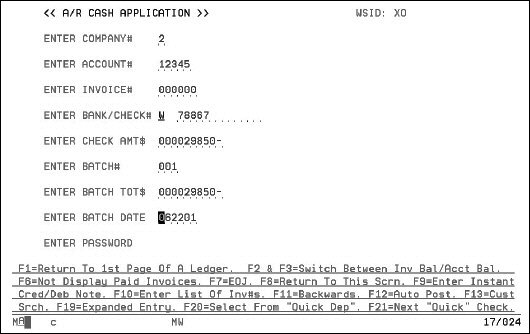
- On the AR Cash Application screen, enter:
- an account number
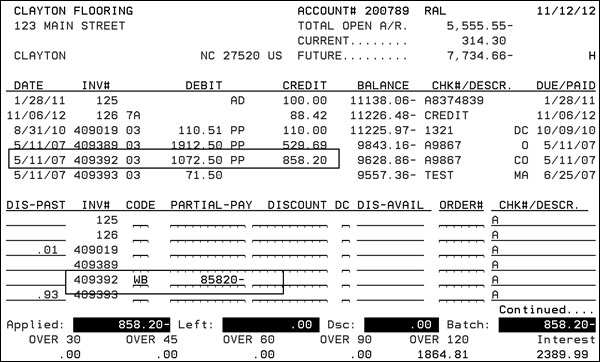
- a negative check amount (ex. 85820- = to $-858.20)
- a short description of the reversal
- a negative batch total
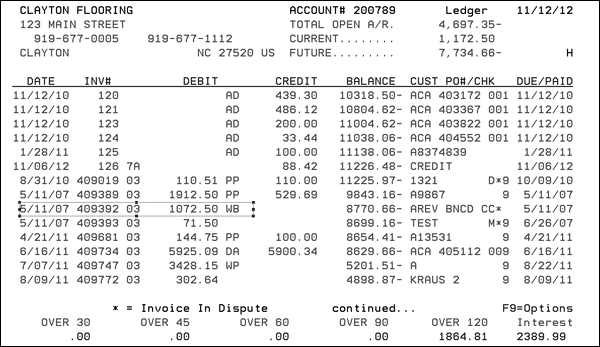
- Press Enter to enter into the AR Cash Application screen. In the example shown below, a payment made on invoice 409392 is being reversed because of a bounced check (code WB).
- use code WP to reverse a current month's deposit if entered in error
- use code WB to reverse a bounced check if the check was deposited this month
- use code DM if you are reversing a deposit from a prior month that is already closed.
- Press Enter to reverse the deposit.
- Use menu option AR 2 to run an Edit and to Post the reversal.
- Check the AR Ledger (menu option AR 16) to ensure the deposit got reversed.
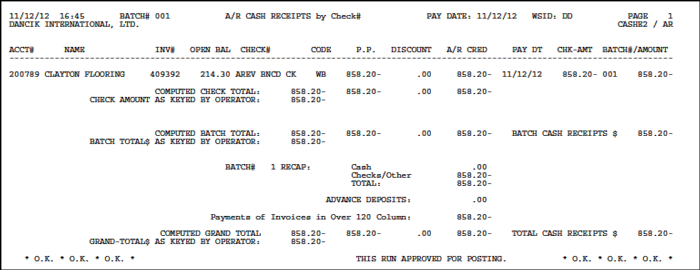
- An AR Cash Receipts report is also generated after the receipts have been posted.
Bounced Checks
AR transaction codes WB and WC are used to handle bounced checks. This code works exactly like the DM (debit memo) code.
Entering WC for Bounced Checks
If the invoice is no longer on the ledger, enter this code on any line
Enter the amount, and an invoice, order, or reference number in the Order# field. Usually the amount is negative, indicating the reduction of cash.
A new or separate transaction appears on the AR Ledger, referencing the invoice or transaction that was previously keyed off.
The new transaction reinstates the debit that was cleared by the bounced check.
- On the cash application screen, enter the necessary information.
- Press Enter to access the account detail screen.
- Enter WC in the Code field.
- Enter the amount of the check followed by a minus sign (-). This tell the system to reverse the check amount out when the cash is applied.
- Press Enter and run your edit to continue to post the entry and reverse the bounced check.
- You can go into the A/R Ledger (option 16 - A/R Ledger Screen) to ensure the WC code appears.
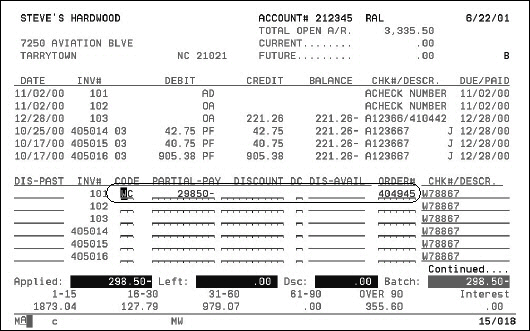
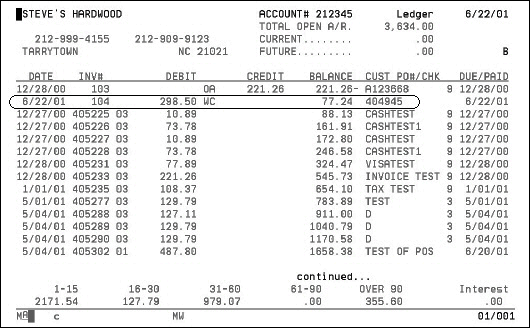
Entering WB for Bounced Checks
You can enter WB as follows:
- For bounced checks when the paid items are still on the A/R Ledger, as when paid in the current month.
- Enter on the lines of the invoices where the original check bounced.
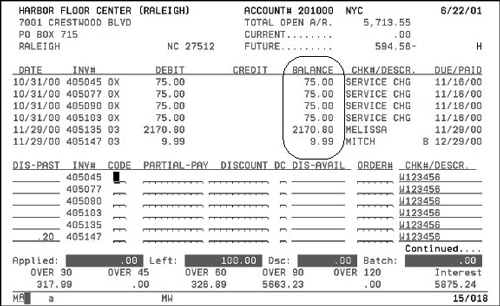
The following figure shows an A/R Ledger listing several invoices. Let's assume the check for the circled invoice bounced.
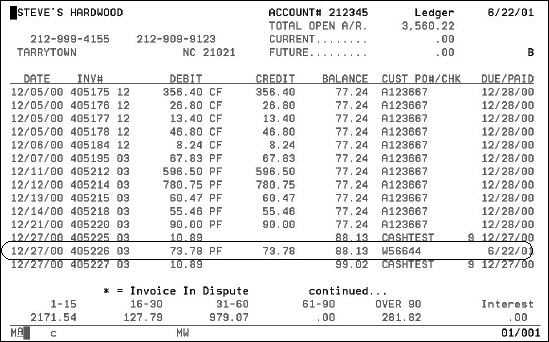
1. On the cash application screen, reverse the amount of the check.
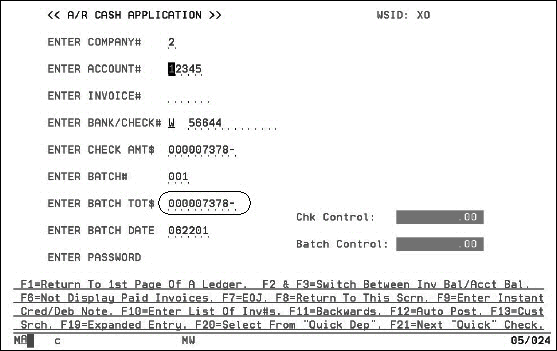
2. Press Enter to access the detail screen for the account.
3. On the next screen, enter a WB code for invoice 405226 and reverse the payment by entering the amount of the payment followed by a minus (-) sign.
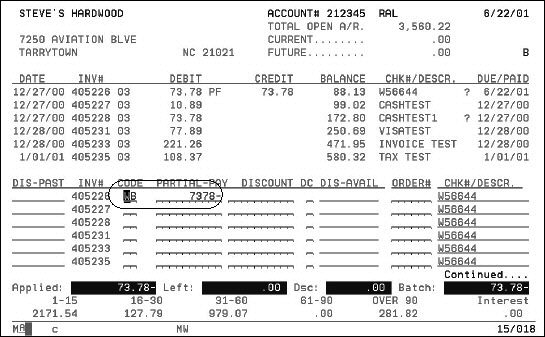
4. Press Enter and run your edit to continue posting the entry to reverse the bounced check.
5. You can go to the A/R Ledger (option 16 - A/R Ledger screen) to ensure the invoice is open for payment and now has the WB code.
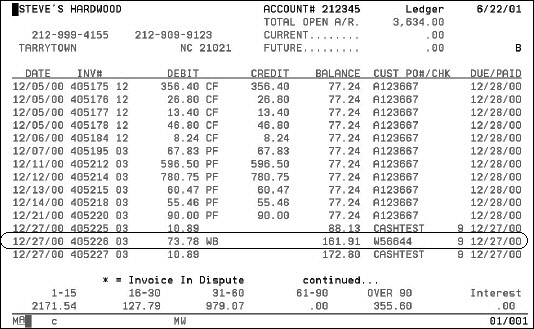
Advance Deposits
Advance deposits are cash receipts taken against an order, as opposed to cash applied to an invoice. These deposits are recorded through point-of-sale order entry and then through the AR system. They are recorded for special cash accounts as well as any other type of account. The system links each advance deposit to the related order number. As the order is invoiced, the advance deposit is automatically applied to the invoice.
If advance deposits are not an important aspect of your business, you may want to include them in accounts receivable instead of tracking them as described here.
A company-wide setting causes advance deposits to drop from all account and company A/R balances. They show on detail screens and reports, but are only included in separate advance deposit totals.
Setting up Company File Parameters
Entering Advance Deposits
Order Desk Program
How the System Processes Advance Deposits
Monitoring Advance Deposits
Matching Advance Deposits
Setting up Company File Parameters
The system administrator needs to set the include advance deposits in A/R parameter for each company number on your system. The advance deposits will show in the detail of the reports and screens, but are not included in the totals. A separate total for the AD (advance deposits) is printed at the bottom of all aging reports.
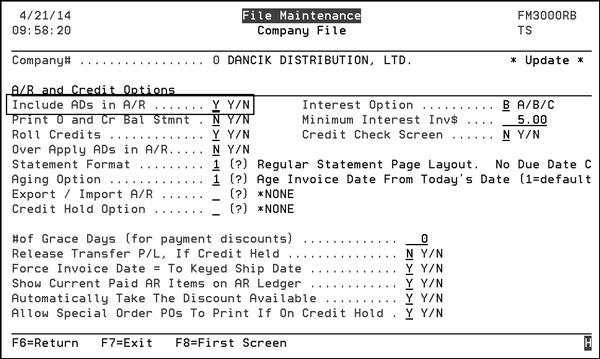
- On the System Setting Menu, select option 3 - Company Settings. The File Maintenance screen appears.
- Enter option 2 to review the A/R and Credit Options for company. The A/R and Credit options for the selected company appear.
- Check the setting of the Include ADs in A/R field.
- If you want to change this parameter, you should only change it just before step 12 of the regularly scheduled EOM close. This ensures that the month you are closing remains at the former setting, but that the new month is initialized correctly for the new setting.
The default setting is Y, which means no special actions are taken concerning advance deposits. They are included in all A/R balances, and treated as payments.
Setting this parameter to N means all aging screens and reports omit advance deposits from totals. If you set this option to N, the system assumes that you have a liability account labeled Advance Deposits From Customers in your General Ledger, and that you will maintain this G/L balance on a monthly basis.
Entering Advance Deposits
You can enter advance deposits either through the Cash Application or through the Order Desk Program.
1. Go through the cash application process using option A. For more information on this process see Option A - Enter Cash on the Ledger Screen.
2. When you get to the Accounts Detail screen enter code AD.
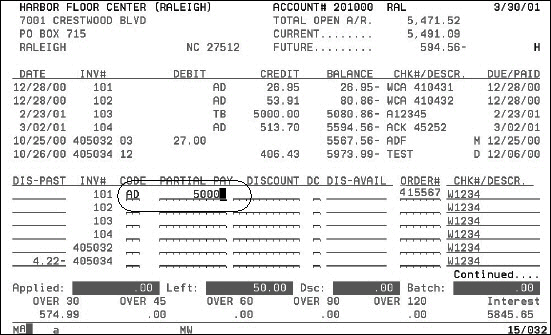
Order Desk Program
Advance deposits are also entered automatically when the Order Desk program is used to post cash. Order Desk Cash is an optional system provided for accepting and recording cash at a counter. In this case, the deposits are automatically posted to AR using the AD code and the order number that the deposit was entered against.
- Enter the customer order using option 1 on the Order Desk menu.
- When the order is complete, the amount of the advance deposit is entered on the Order Desk Cash Receipts screen.
- The Order Desk operator then processes the order or prints a pick list or order acknowledgement, or both. All printed documents list the advance deposit.
- All advance deposits are keyed with the order numbers to which they relate.
- When the order desk does their end-of-day close, the cash receipts are balanced to copies of all documents or to the Order Desk Cash Report.
- The cash is then posted to AR and end-of-day documents and reports are submitted to the AR department.
How the System Processes Advance Deposits
Advance deposits are processed as follows:
- The order, when viewed on screen, shows the advance deposit and the balance due.
- The advance deposit is kept in a temporary file when entered at the order desk.
- Advance deposits are posted and appear on the AR Ledger, but are totaled separately from other AR transactions. Advance deposits never apply against outstanding invoices.
- For example, if an account had a 90-day old invoice and places an advance deposit against a new order, the account still shows the invoice as over 90. The advance deposit shows in the Current column. Advance deposits always show as a separate credit transaction on A/R until they are applied to an invoice and are identified by the AD code.
- When advance deposits are included in AR, they are always aged in the current or future columns, regardless of the date the deposit was entered.
- Advance deposits are always coded with transaction code AD against a system-generated order number.
- When the same order is invoiced, its advance deposit is automatically applied to the invoice.
- When point-of-sale invoicing program is used to invoice open orders (F16) the final screen displays the status of the order and all previous deposits.
- When the invoice prints, it shows the amount of the advance deposit applied against it. If a back order is printed as a result of the invoice, the remaining deposit amount is printed on the back order pick list.
- All advance deposits require entry of an order number.
- When an invoice is posted to A/R, the system checks for an advance deposit against the order number that is related to that invoice. If an advance deposit for the related order number is found, it is automatically applied to the invoice.
- Advance deposits automatically applied use the transaction codes DR (deposit reduced or changed) and DA (deposit applied) as shown on the invoice.
- If the deposit is equal to or less than the invoice amount, the entire deposit is applied.
- If the deposit is greater than the invoice amount, the invoice will be fully paid by the deposit, and the remaining amount will stay as an open advance deposit.
- The remaining portion of the advance deposit can be applied automatically to another invoice against the same order number, or applied by AR personnel to any open item. Once applied, the AR Ledger and History.
Monitoring Advance Deposits
Every night an Automatic Application of Advance Deposits Report prints. You can also run the Open Advance Deposits Report at any time, from the AR Reports menu.
The Automatic Application of Advance Deposits applies open advance deposits to invoices for the related order and leaves a permanent audit trail of how deposits were applied. When a deposit is applied:
- Two records are added to the AR Monthly Cash Reports, the AR Monthly Cash Reports, and to the AR History.
- One record contains code DR (deposit reduced) and shows a negative cash entry, representing the amount subtracted from the open advance deposit.
- One record contains code DA (deposit applied) and shows a positive cash entry, representing the amount applied to the open invoice.
- The total of the two records will always equal zero. The cash has simply been moved from the advance deposit record, the open invoice. The DA record will contain the original check number of the advance deposit, and the invoice number to which it applied.
Matching Advance Deposits
This accounts receivable feature enables the system to automatically key-off matching credits and debits (for the same order). For example, payments made against an order or invoice at the counter will automatically be applied to current or subsequent invoices for that order. Refunds will match against credit memos. This feature eliminates the need to manually apply these open amounts against each other.
To activate the matching of advance deposits, two fields in the System Wide Accounts Receivable Options must be flagged to Y. You may also activate the overpayment of invoices option from the Company Settings area of the System Settings menu. For more information on the Company Settings refer to Company Settings - AR Options. For more information on matching advance deposits refer to System Wide Settings - Accounts Receivable Options.
The matching of advance deposits automatically takes place during night jobs. This feature matches positive advance deposits against positive invoices, and negative advance deposits against negative invoices (refunds against credits).
Prior to Night Jobs running, you have deposits received and posted to the accounts throughout the day. During Night Jobs, the system will look for all positive AD and match it against positive invoices and positive AD and negative AD for the same amount for the same order. This generates the first matching AD report from Night Jobs. The second AD matching is the credit AD and matching this against negative invoices. This generates the second matching AD report from Night Jobs.
The following day if you run your aging in the morning, all matching AD has occurred and the aging is up-to-date. If you run the aging later in the afternoon, it might have deposits from today that have not been matched.
The matching of deposits appear on the next day's daily deposit report. It appears as check # to Match and should have an amount of zero. If it does not, the Auto-Match report from night jobs will issue an error message to contact Kerridge, and will not match the AD against the invoices. Please fax this report to our Customer Support Department at (919) 379-3716. It can also be emailed to support@Kerridgecs.com. If we have the matching report, we can tell immediately what did not work and will be able to correct the problem.
The example below demonstrates how this feature works.
Example
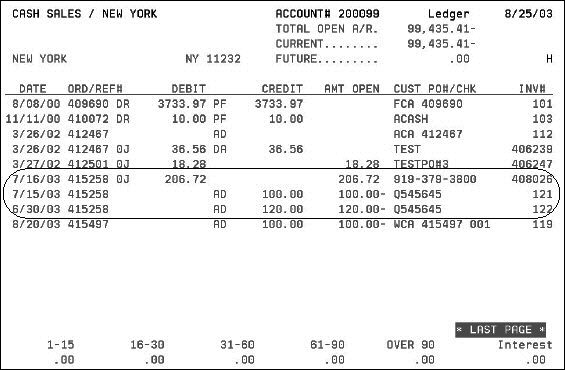
- An invoice is generated that has two advance deposits. As shown below order number 415258 shows two advance deposits, totaling $220 being applied toward a debit of $206.72.
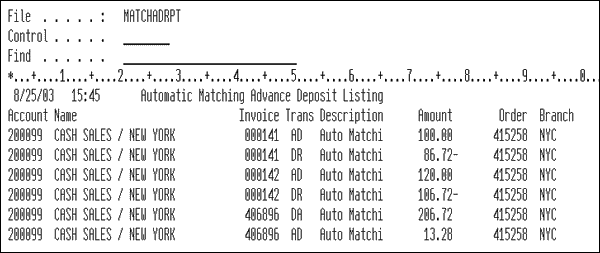
- Since the overpayment option in the Company Settings program is set to Y, the overpayment is shown on the Matching Advance Deposits report. This report is run automatically via night jobs.
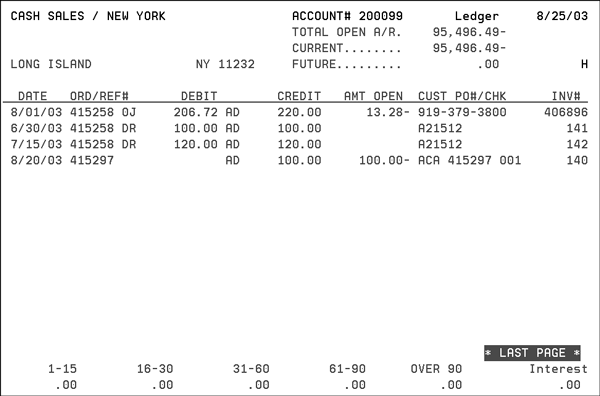
- The following screen shows the matching of advance deposits and the application of overpayment. In this example, the two deposits are applied to the one invoice. The deposits are cleared, with the remaining deposit applied as an overpayment to the invoice. If the overpayment option in the Company Settings program was set to N, then the last deposit would have remained partially unapplied, with a remaining 13.28 left, and the invoice would be paid in full, but not overpaid.
Auto Post Small Differences for Cash Application
You can set the system to automatically clear small payment discrepancies while applying cash. You can set an allowable underpayment limit, and an allowable overpayment limit, which is tested on a check-by-check basis while applying cash. The system administrator can activate this feature using the following procedure.
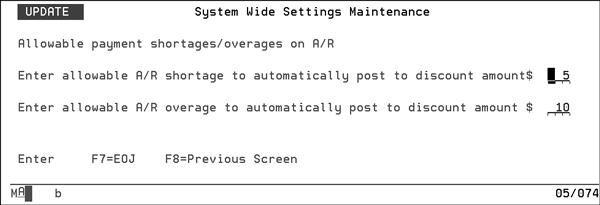
- On the System Settings Menu, select option 4 - System Wide Settings.
- Enter an action code and password and search for the setting Allowable Payment shortage/overages on A/R.
- Enter the allowable shortages and overages that are automatically discounted when applying cash. Enter full dollar amounts only. These amounts are allowed on a check-by-check basis.
- Press F12 to automatically apply the difference to discount. Overages are applied as negative discounts. Shortages are applied as positive discounts.
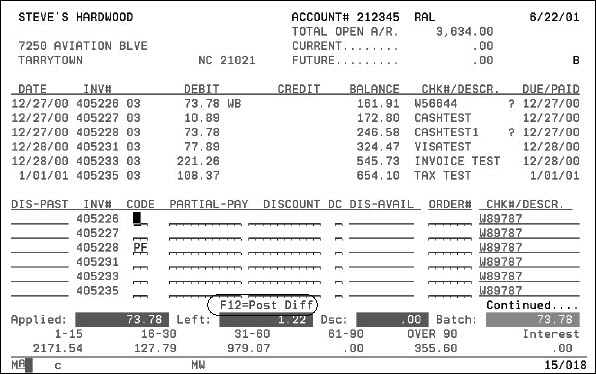
The above figure shows the application of a check for $75.00. Only $73.78 was required to clear the invoices, leaving $1.22 overage. Because the overage is within the allowable limit, the F12 option appears at the bottom of the screen.
Making Corrections on the AR Ledger Screen
Correcting Batch Totals
- If you have entered an incorrect batch total, refer to the edit report of your cash entry.
- From screen 1 of cash entry, enter the first account information as listed on your edit report, NOT the first account number keyed. Enter the account number, check number, check amount, batch number, and the correct batch total.
- Press Enter on screen 1 and on all of the screens where cash was applied against invoices. Then run the edit report.
Correcting Check Amounts/Check Numbers
- Run an edit report of your cash entry.
- On the first cash entry screen, enter the incorrect check amount/number as shown on your cash edit and press Enter.
- Press F8 and enter the correct check amount/number.
- On the next screen, pay invoices and apply any credits and press Enter.
- Rerun the edit report.
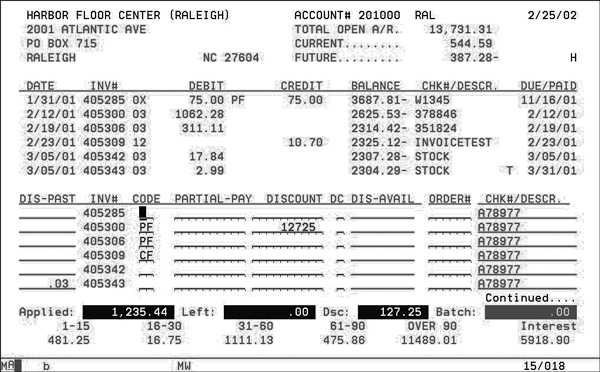
Option B - Enter Cash via Data File Utility Screen
Correcting Check Amounts/Check Number using Method B - Data File Utility Screen
Data File Utility (DFU) is a simple IBM data entry system. We do not recommend that you use this option as your primary method of entering cash. However, this program makes entering corrections very easy if your cash edit is out of balance or in error.
Enter the account and invoice numbers in error as they appear on your edit, and then go to option B to enter corrections.
1. On the AR Menu, type 1 and press Enter. A message prompts you to enter a choice.
2. Enter option B and press Enter.
3. On the next screen, enter the company number, account number, and invoice number of the transaction you want to correct.
4. Press Enter. The screen expands to show the details of the invoice.
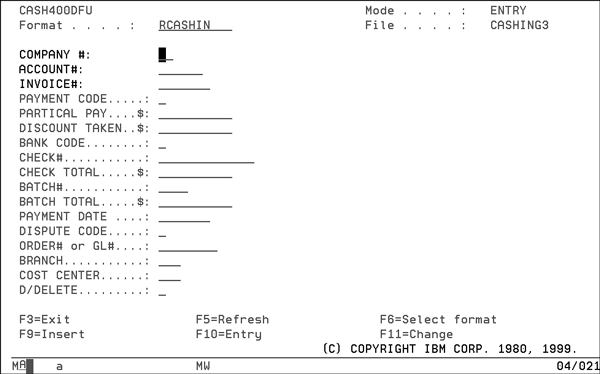
The Filename shown at the top center of the screen is RCASHIN (Cash Input) followed by your work station ID.
5. Perform one of the following functions:
- Change any of the fields in error, and press Enter.
- If you want a record deleted, select it then press F4. Screen 1 reappears after you press Enter or F4.
- To update another record or press F7 to request end of job. After you press F7, a DFU End of Job screen appears.
6. Press Enter once or twice until the A/R Menu is reappears. You should rerun an edit using option 2 on the A/R Menu.
Be careful to only tab through these fields. Using the Field Exit key will erase the data.
The following table describes the fields on the expanded screen.
|
Field |
Description |
|
Format |
How the fields are configured. |
|
Mode |
Entry mode is the only option. |
|
File |
The name of the file you are working in. |
|
Company# |
The company number where the checks are being posted. |
|
Account# |
The account number where the checks are being posted. |
|
Invoice# |
The invoice number that the checks are being posted to. |
|
Payment Code |
Codes that represent cash application methods. |
|
Partial Pay |
The amount paid on the invoice. |
|
Discount Taken |
The discount applied to the batch of checks. |
|
Bank Code |
Code representing the bank where the check is being posted to. |
|
Check# |
The check number. |
|
Check Total |
The amount of the check. |
|
BATCH# |
This represents the batch where the check is being applied. |
|
Batch Total |
Represents the deposit total. |
|
Payment Date |
Date the checks were applied to the system. |
|
Dispute Code |
Codes that represent disputed invoice. |
|
Order# or G/L# |
This represents the G/L where the cash is being applied. |
|
Branch |
This represents the branch where the cash is being applied. |
|
Cost Center |
This represents the cost center where the cash is being applied. |
|
D/Delete |
Clears the fields and reverses the deposits. |
Correcting Check Amounts/Check Number using Method B - Data File Utility Screen
Using Method B, you must be careful not to erase data (using field exit) on this screen.
- Enter the company number, account number, and invoice number.
- Tab down to the Check#/Check Amount field and enter the correct amount/number.
- Press Enter.
- Enter the next invoice number assigned with the incorrect check number/account.
- Rerun the edit report.
Option Q - Quick Deposits
You can use this option to store and retrieve daily deposits for cash applications. You could also use this option to quickly post cash to an account as on-account and then go back later to apply on-account to the appropriate invoices.
Updating a Quick Deposit Entry
Creating a New Batch of Checks
Quick Deposit Guidelines
- If you do not post the quick deposits, then when you reconcile the accounts and checks, your batch and check totals on the Cash Entry screen are the actual totals, just as you would be entering when applying cash without the use of the quick deposit screens. You should use F20 and F21 on the Cash Entry screen to avoid re-entering the check and account numbers.
- If you are posting the quick deposits using F12 on the Quick Deposits Screen, when you reconcile the accounts and checks, your batch and check totals will be zero. Also remember to key off the on-account payments that were posted with F12, as part of the application of each check.
- We recommend that you split your 99999 account number entries (for miscellaneous, non accounts receivable cash) into a separate batch, rather than enter them via the Quick Deposits Screen. The Quick Deposits Screen cannot enter the applicable G/L accounts, branches, and cost centers. If you post them via Quick Deposits, they will not have G/L numbers. In this case, they would be ignored at month's end, and will need to be entered again via the normal cash entry methods again.
Updating a Quick Deposit Entry
- To select a the previously entered batch, press F6 on the first Quick Deposits screen.
- Select a batch and press Enter. The first Quick Deposit screen refreshes with the selected batch information displayed.
- Press Enter. The second Quick Deposit Entry screen appears showing the batch details.
- Make any necessary corrections or additions.
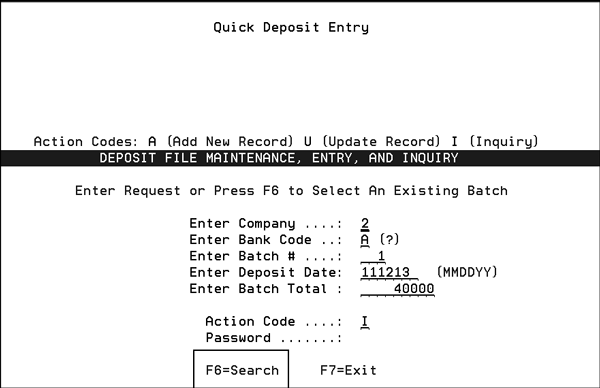
A search box appears that allows you to select an existing batch.
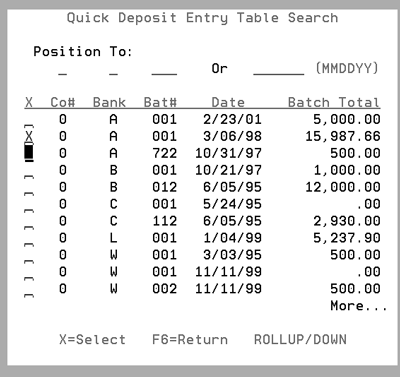
The Quick Deposit Search screen supports scrolling by batch number or by batch date. You can use the Position To fields to arrange the search by Co#, Bank, Bat#, or Date.
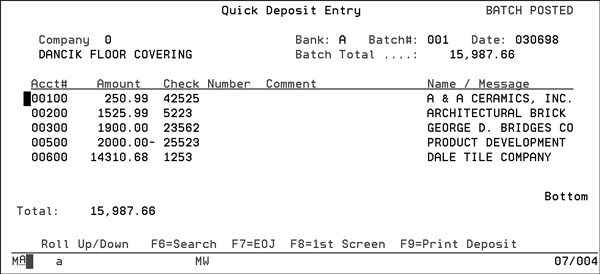
To update a batch, use Action Code U.
Creating a New Batch of Checks
- Enter Q at the enter cash prompt. The first Quick Deposit Entry screen appears.
- Enter the necessary information, such as Company#, Bank Code, and Batch#. Before you enter the checks, you must enter a batch number, batch total, date, and bank code, just as you would for normal cash entry.
- Press Enter to access the second Quick Deposit Entry screen. This is where you will actually enter the checks.
- Enter a list of checks on the Quick Deposit screen. Only the account number, check number, and amount are required.
- Press Enter to access the Customer Search window.
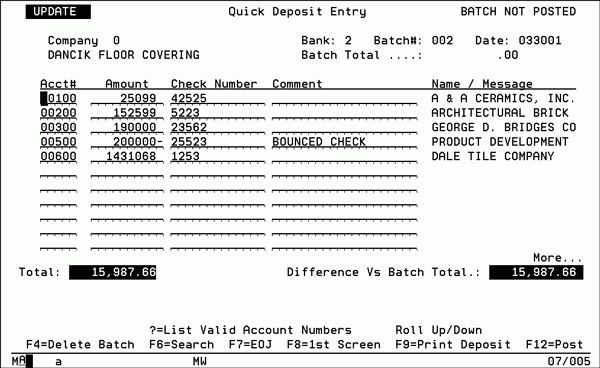
- Select a customer account by placing X in the far left field. Press Enter to return to the Quick Deposits Entry screen. The Name of the company that made the payment is automatically inserted under Name/Message, and the total is calculated, as shown in the following figure. Notice that Check Number 25523 bounced. This is signified by a minus sign (–) to the left of the check amount. This removes the check amount from the batch total.
- After you have finished entering the necessary information, press F9 to print a deposit report. The report looks similar to a deposit slip, especially when printed on a laser printer.
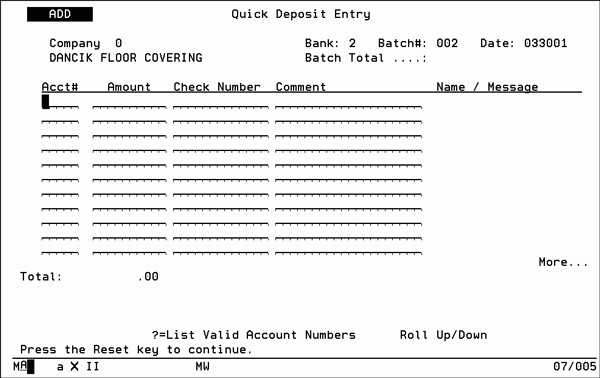
The following table describes the Quick Deposit function keys.
| Function Key | Description |
| F7 | Ends the job and returns you to the main accounts receivable menu. |
| F8 | Returns you to the first Quick Deposit Entry screen. |
| F9 | Prints a deposit after entering all entries. This deposit report looks similar to a deposit slip, especially when printed on a laser printer. |
| F12 | Posts the quick deposit entries to AR. This posts each check as an OA (on-account payment). This gives you the advantage of quickly updating the customer A/R balances, and their available credit, before the more time consuming task of reconciling each payment, and entering against specific invoices. Later, when you reconcile each of these checks (apply to invoices), you will enter cash with batch totals and check totals equal to zero. This is because you will be clearing the previously posted on-account payment against invoices, and not actually posting additional cash. |
| F20 | F20 displays the quick deposits and allows you to select checks from that screen for reconciling. Using F20 eliminates re-entry of information such as the check number and account number. |
| F21 | This function does not display the Quick Deposits Screen. It simply gets the next unselected check from the quick deposit and goes directly to the Cash Application screen for that account. F21 is the quickest way to go through an entire quick deposit. |
Option W - Work With Accounts In Use
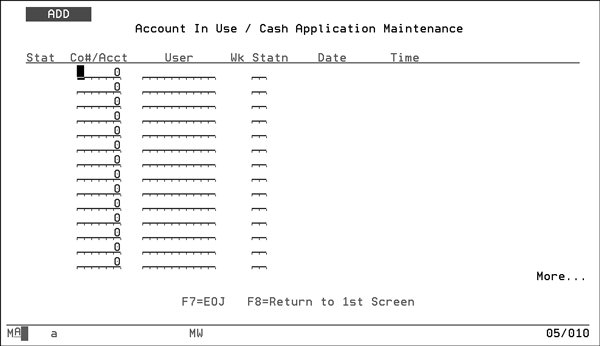
When you apply cash to (reconcile) an account, that account is considered busy. The system places a record into the Accounts In Use file. This prevents other users from reconciling the same account you are working in. If another user tries to reconcile a busy account, the screen displays an error message that includes the name of the user who is working on the busy account.
Accounts in Use Guidelines
- Even if you are not reconciling, you can add an account to the Accounts In Use screen to prevent anyone else from reconciling it. Accounts on the Accounts In Use Screen are considered busy.
- When you run cash edits, busy accounts are clearly identified.
- When you post cash, busy accounts are bypassed, and remain in the edit state.
- Enter a W on the Cash Entry Options screen to view the busy accounts, including the name of the user and work station that is reconciling, as well as the date and time each account was marked as busy. Depending on your passwords you can update or add to this list.
- The Account In Use/Cash Application Maintenance entry screen appears.
The appearance of the second screen depends on the action code you enter. If you use action code A or U, the Add screen appears.
